The CIP database is used by both the CIP web application and Capture CIS. When configuration settings are modified (as described in sections Customize CIP Fields or Component Views) Capture CIS is unaware of the changes. Settings in the CIS .DBC file tell Capture CIS how to interpret data found in the database and how to properly control the display in CIS Explorer. When you create or update the DBC configuration file you must open the CIS configuration tool that is available in Capture CIS.
Five DBC configuration files are pre-installed with the CIP web application. Each provide a different set of information for CIS Explorer as defined below.
•CIP-E V7.7 CIS DB.DBC
This DBC file is configured with out-of-the-box settings for CIP that includes distributor part information in the manufacturer display. Each distributor part information is shown on a separate line along with the corresponding manufacturer part information. If any of the user fields or other fields have an alias to another name, you will need to update the DBC file using CIS configuration option in Capture CIS.
•CIP-E V7.7 CIS DB_NODISTRIB.DBC
This DBC file is configured with out-of-the-box settings for CIP that does not include distributor part information in the manufacturer display.
•CIP-E V7.7 CIS DB_WITHCOMPLIANCE.DBC
This DBC file is configured with out-of-the-box settings for CIP with Compliance Module log in enabled. The DBC file configuration includes distributor part information in the manufacturer display.
•CIP-E V7.7 CIS DB_NORELATIONAL.DBC
This DBC file is configured with out-of-the-box settings for CIP without any relational table settings.
•CIP-E V7.7 CIS DB_WITHCOMPLIANCE_NOSILICONEXPERTPNS.DBC
This DBC file is configured with out-of-the-box settings for CIP with Compliance Module log in enabled with all distributor part information but without Silicon Expert Part Number. Use this DBC file if you want to include distributor part numbers in a BOM but do not wish to include Silicon Expert part numbers.
Click download DBC files to obtain a copy of the DBC files.The CIS .DBC configuration file is generally shared by all CIS Users. Only one .DBC file needs to be modified and placed in a network location to provide read-only access for all CIS users. Consult with your project leader or librarian before modifying the .DBC file.
This Appendix includes three sub-sections that explain how to update the DBC file and create a new file using the CIS configuration tool.
▪Refresh DBC file
▪Update DBC file
▪Create DBC file using CIS Configuration Wizard
Refresh DBC file
When changes to fields are minor and affect fields in component views, a simple refresh of the DBC file is required. The configuration of the CIP/CIS .DBC file may need to be refreshed or updated after the following situations occur:
▪The display name of an enabled field changes as described in Customize Component Fields.
▪One or more new fields are added as described in Customize Component Fields or Component Views
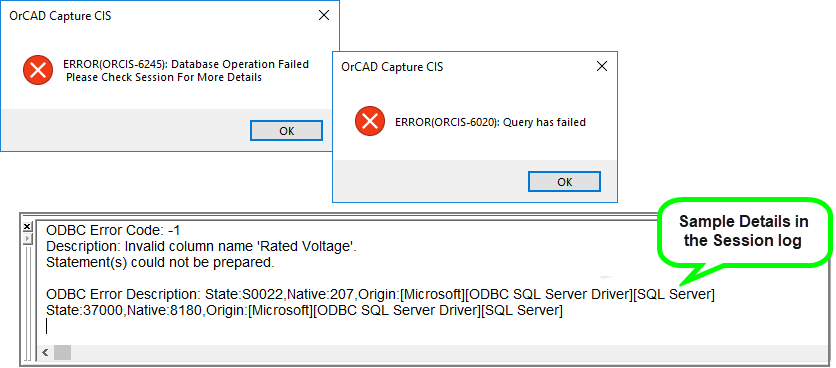
When component fields are modified without updating the DBC file, CIS users may see SQL errors in their Session log as shown in following image.

Error message in the Capture CIS > Windows > Session log
To refresh the DBC:
1.Open Cadence OrCAD Capture CIS and select Options > CIS Configuration.
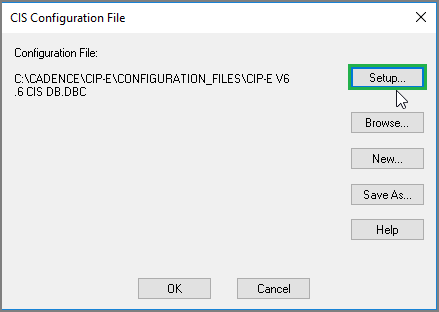
2.Select the Setup button. Then select OK. When setup opens select OK to save the settings.

CIS Configuration Setup
Update DBC file
When changes to fields are more significant, e.g. addition or change of a view, a simple refresh of the DBC file is insufficient to resolve errors identified in the Session log.
To update the DBC:
1.Open Cadence OrCAD Capture CIS and select Options > CIS Configuration.
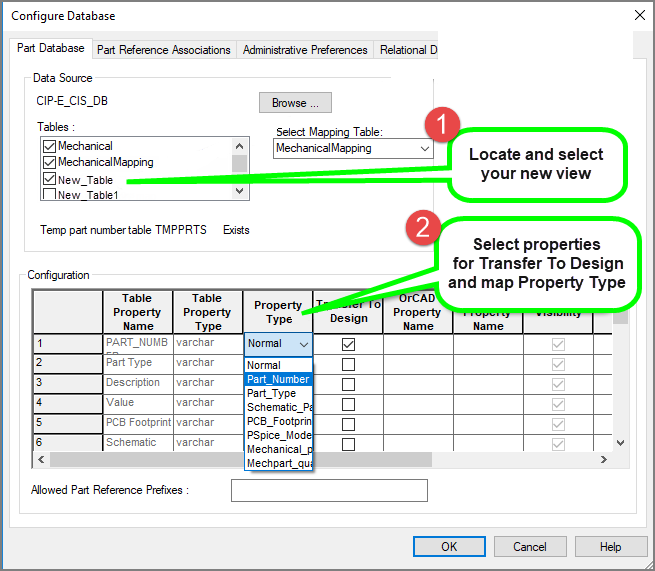
2.Select the Setup button. The Configure Database window appears.

Configure Database Configuration file
3.Locate the View or Table you want to add and select the check box to enable it for configuration. Views and table that are shown depends on permissions set in your SQL database. You may see table names prepended with "CIP_". These are used by CIP web application. DO NOT select any of these tables.
4.Review the list of properties and configure the fields you want to Transfer To Design. Make sure you map the Property Type for the following fields:
▪Part_Number
▪Part_Type
▪Schematic Part
▪PCB_Footprint
5.You may make other changes to match your company Schematic guidelines. Refer to the Cadence OrCAD Capture CIS User’s Guide (Open CIS, click Help > OrCAD Capture CIS Help ) for more information regarding Creating a Configuration File.
6.When you complete all your changes, click OK to save the changes and then OK to exit the tool.
Create DBC file using CIS Configuration Wizard
A new configuration of the CIP/CIS .DBC file that may be required is dependent on the type of modification. CIS Configuration tools in Capture will not refresh changes made to the relational table, which includes manufacturer and distributor fields.
Changes to the manufacturer fields using Customize Manufacturer Part Fields or Customize Component Manufacturer Part Fields will require new DBC file. You may be able to remove the relational table settings and re-add them. If not, you can use the CIS Configuration Wizard to create a new DBC file.
Capture CIS utilizes the ODBC data source through its own database configuration (DBC) to access the database. The CIP Client installer automatically adds a data source name of CIP-E_CIS_DB.
CIS has a built-in wizard for creating DBC files. To ensure CIS can access both Table and Views in your database, make sure that you have “TABLES OPTION=TABLE,VIEW” included in the [Part Management] block of your Capture.ini file.
To create a new DBC file:
1.Read the entire procedure below before going through it so your database is configured correctly before you begin the steps.
2.Open Capture CIS.
3.Under Options > CIS Configuration…, click the New… button and then Next.
4.Select the appropriate Data Source (this list is pulled from your systems ODBC data sources, so if you don’t see one for your database, you need to add an ODBC data source first). The default ODBC data source to use is CIP-E_CIS_DB. Then click Next.
5.At Database Configuration: Step 2 display, map the tables into which you want to place parts. from in CIS. Click Next.
Note: The list that displays shows all tables in the SQL database. Select only view names that are already configured in CIP.
6.At Database Configuration: Step 3 (1 of n) display, you will repeat for each table you map in (5) (previous step). Select the appropriate table column to map Part_Number and Value to. Click Next.
7.At Database Configuration: Step 4 (1 of n) display, you will repeat for each table you map in (5). Select the appropriate table column to map Part_Type and Schematic_Part to. Click Next.
8.At Database Configuration: Step 5 (1 of n) display, you will repeat for each table you map in (5). Select the appropriate table column to map PCB_Footprint (optional) and PSpice_Model (optional) if you plan to use these fields. Click Next.
9.At Database Configuration: Step 6 display, select which part properties you want to transfer to the schematic page when you place the part. Click Next.
10. At Database Configuration: Step 7 display, click Next. If you want to use the ICA (Internet Component Assistant – aka ActiveParts) you must check the box for ICA Properties and select the fields to map to your database tables (typically all of them)
11. At Database Configuration: Step 8 display, select the browsable properties (items which will be linked to external documents, like URLs or datasheets). Click Next.
12. At Database Configuration: Step 9 display, select the visibility of the items you previously set to transfer to the design. Click Next.
13. At Database Configuration: Step 10 display, select the keyed properties (normally only Value)
14. Click Finish. You will now be configured with the new .DBC file. You may continue to make changes to the DBC file before saving.
15. To add relational table (manufacturing information), select the Relational Database tab.
16. For each Primary Table Name configured, select Part_Number as the Primary Key then select either CIS Manufacturer Parts or CIS Manufacturer Parts No Distributor (depending on whether you want to show distributor information) for the Relational Table.
17.Click OK to save and then OK to exit.