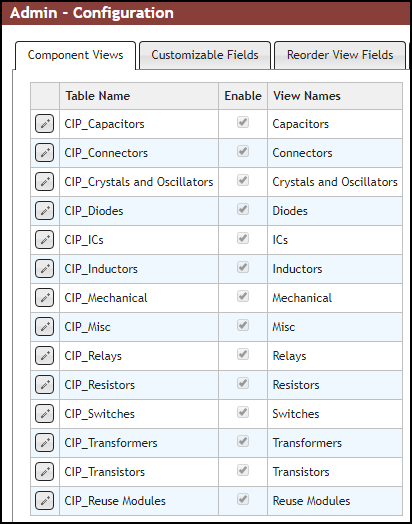
Component Views can be created to show more specific categories and fields for parts than the default views. All tables that can be used to derived new views are shown in the Table Name column under Admin > Configuration > Component Views, but tables are only shown in this section. Component Views are seen by the CIP users and CIS users. Views can be renamed or removed. Any changes to a component view will likely require an update to the CIS .DBC file used by Capture CIS. Review the Appendix for instructions to create or update the CIP/CIS .DBC file.

Default CIP Tables and Component Views
To create a new Component View
1.Click the Edit ![]() button next to the table name from which to create the new view.
button next to the table name from which to create the new view.
![]()
2.Enter a name for the view in the Add View field and click the ![]() button to create the Component View. The example below shows the view name, LEDs, is entered into the Add View field of the CIP_Diodes table.
button to create the Component View. The example below shows the view name, LEDs, is entered into the Add View field of the CIP_Diodes table.

Creating Component View
3.Click the Save ![]() button when you have finished adding your views to the selected table.
button when you have finished adding your views to the selected table.

Once you've created a new component view, you can optionally begin to add, import, or move parts into it.
To rename a Component View
1.Click the Edit ![]() button next to the table name with the view that you want to remove.
button next to the table name with the view that you want to remove.
![]()
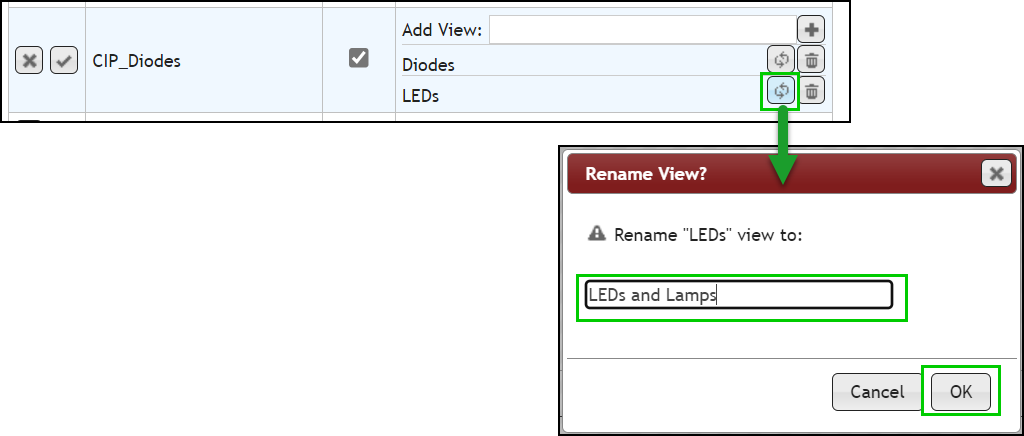
2.Click the Rename ![]() button next to the view you want to rename.
button next to the view you want to rename.

3.Click the Save ![]() button to complete the rename.
button to complete the rename.

To remove Component Views - Remove a single view
1.Click the Edit ![]() button next to the table name with the view that you want to remove.
button next to the table name with the view that you want to remove.
![]()
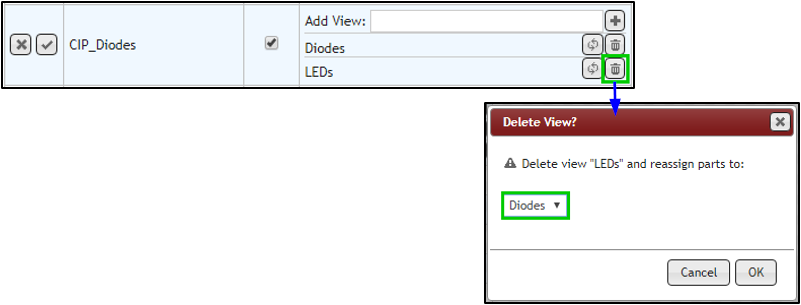
2.Click the Delete ![]() button next to the view you want to remove. You will need to select a new view to move all parts into before deleting the view, as shown in the following figure, then click OK.
button next to the view you want to remove. You will need to select a new view to move all parts into before deleting the view, as shown in the following figure, then click OK.

3.You may still cancel and restore the view by clicking the Restore View ![]() button.
button.

4.Click the Save ![]() button to complete the deletion and part reassignment.
button to complete the deletion and part reassignment.

To remove Component Views - Disable a table
If you have a table you do not want to use in CIP, you can disable it. Any views and parts derived from the disabled table will be disabled and hidden, but not be deleted.
1.Click the Edit ![]() button next to the table name that you want to disable.
button next to the table name that you want to disable.
![]()
2.Deselect the Enable checkbox and click the Save ![]() button. Any parts in the table remain but the table is disabled.
button. Any parts in the table remain but the table is disabled.
![]()