After you configure your file for deletion, you can review the log file to preview a description of changes before you delete your parts from the CIP database. The preview functionality is enabled when the Simulate check box is selected.
The Simulate check box allows you to verify actions before they are performed on the database. Each time you click the Delete button a deletion or simulated deletion will occur and a log file will be created. The log file name corresponding to the Simulate option contains a date-time code and the Simulate text in the file name. The log file name without the Simulate option contains a date-time code and the Delete text in the file name. The Component PNs, Manufacturer/Manufacture PNs, and Distributor/Distributor PNs deleted (or to be deleted in the case of simulation) are recorded in the log file.
The summary section below the Configuration and Delete buttons shows details like Total Rows, Not Found, Parts Deleted, Mfr Parts Deleted, etc. Additional details can be found by reviewing the log files shown in the Logs tab.
1.Click the Simulate check box to enable simulation mode and click the Delete button to continue.

Simulate the Deletion
2.The summary will be updated until the simulation is completed. No deletions will occur during simulation.

Deletion Summary
3.Click the Logs tab to view the list of completed logs. Simulation log files will have the Simulate text while deletion logs will have the Delete text. Click an individual log file name to view it. Click the Download button to save the file. Notice that logs with the Simulate text in the file name also have the simulation message at the top and bottom of the log file, as shown below.

Log File Selected, Displaying Simulation Message at the Top of Log

Summary and Simulation Message at the End of Log
4.Review the log file and confirm the desired changes. When ready, click the Delete tab.
| Keep in mind that once parts are deleted from the database, the only way to recover is to restore a previous database backup. Re-importing the deleted parts would bring the parts back, but all parametric field values would be lost unless you also saved a file to import those. Reviewing the log file simulation before deleting parts from your database helps minimize problems associated with accidental deletion. |
5.Uncheck the Simulate check box and click Delete.

Uncheck Simulate and Proceed with Deletion
6.A Delete Parts? confirmation window appears. Enter the word DELETE in ALL CAPS. The Delete button will be disabled until you do so. Click Delete. The summary will be updated until the deletion is completed.

Delete Parts Confirmation Pop-up Window
7.Click the Logs tab to view the list of completed logs. Simulation log files will have the Simulate text in the file name, while deletion logs will have the Delete text. Click an individual log file name to view it. Click the Download button to save the file. Notice that logs with the Delete text in the file name do not have a simulation message at the top and bottom of the log file, as shown below.

Log File Selected

Summary at the End of Log
Here's an example of what you can specify. The column header names in your CSV file are up to you, since you'll be mapping those when you Configure for Deletion.
PN |
MFR |
MFR PN |
Dist |
Dist PN |
Expected Behavior |
PN001 |
|
|
|
|
Delete PN001 and ALL associated child Manufacturer/Manufacturer PN and Distributor/Distributor PN pairs. |
PN002 |
MFR02 |
MFRPN11 |
|
|
Delete MFR02/MFRPN11 association from PN002, along with ALL child Distributor/DIstributor PN associations on MFR02/MFRPN11. |
PN003 |
MFR03 |
MFRPN25 |
Dist3 |
DistPN20 |
Delete Dist3/DistPN20 association from MFR03/MFRPN25. |
PN003 |
MFR04 |
MFRPN39 |
|
|
Delete MFR04/MFRPN39 association from PN003, along with ALL child Distributor/DIstributor PN associations on MFR04/MFRPN39. |
PN004 |
|
MFRPN54 |
|
|
No action, MFR not found. |
|
MFR04 |
MFRPN54 |
|
|
No action, PN not found. |
PN004 |
MFR04 |
MFRPN54 |
|
DistPN33 |
No action, Dist not found. |
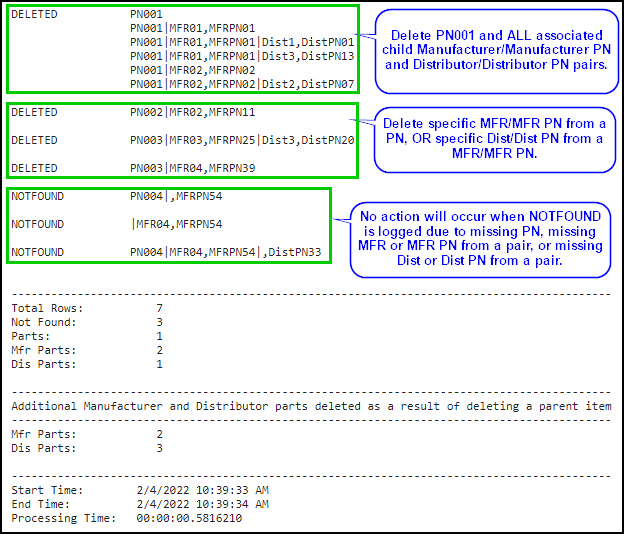
Below is the log file from the example above, showing how deletions are output in the log. A pipe (|) delimiter separates Component PN, MFR/MFR PN, and Dist/Dist PN. A comma (,) delimiter separates MFR and MFR PN pairs and Dist and Dist PN pairs. Each parent or child deletion is logged on a new line.
Import File Format
Ensure your .CSV file satisfies the following formatting conventions:
•The import file must be in CSV format. Excel can be used to generate CSV files. After creating your file, you need to save the file as a .CSV file.
•The first line of the file must contain the field names for each column. If a title is in the first few lines of the file, you will need to remove those lines first. The field name for each column must be unique.
•There must be a column for the component PN (PART_NUMBER). Parts without a part number will not be deleted and will be considered Not Found. Manufacturer, Manufacturer PN, Distributor, and Distributor PN are optional columns, only required when you want to delete specific associations to a component PN.
•The CSV file must not have any duplicate column headers. This includes duplicate blank columns with blank headings.
•All rows within the CSV file should have the same number of columns.
•Characters in the CSV file must be UTF-8 encoded to avoiding encoding warnings.
Warning about using Excel
Older versions of Excel, when used to create or edit .CSV has caused problems with creating files that are not well-formed. When this occurs, you will either need to manually fix the file or use a later version of Excel.
Log files
Log files are accessible from the Admin > Bulk Operations > Bulk Delete > Log tab. Two types of log files may be generated, (Simulate and Delete). The file name of each log file consists of the date, separated by a "T" and the time, followed by "Simulate" or "Delete." For example, the file name of the log is based on one of the two naming conventions:
YYYYMMDDTHHMMSS_Simulate.txt – generated each time you run Delete with the Simulate check box selected.
YYYYMMDDTHHMMSS_Delete.txt – generated each time you run Delete without the Simulate check box selected, where:
YYYY = year
MM = month
DD = day
T - separates the date and time of log generation.
HH = hour
MM = minutes
SS = seconds
The log files record information for potential or actual deletions, warnings, and errors. Warnings are generated for parts that are not processed. This is often caused by improperly configured field mappings.