When you complete the steps in Module 2 you will be able to:
▪Simulate how CIP will be impacted before you import parts
▪Understand the different uses of the Add Only and Add and Update buttons
▪Add capacitors to CIP
Instructions presented in this module assume you have successfully completed all steps in Module 1. If you have not created a backup of your CIP database during Module 1, backup your database now. This module begins with the CIP Import screen.
To import parts into the Capacitors View
Step 1: Select the Simulate check box if it is not already selected and click the Add and Update button. The green status bar indicates when the CIP simulation is complete. The results of the import simulation are summarized below the green status bar.

Simulate how the import will impact CIP database before you import parts
Step 2: Select the Logs tab and click the log file name to open and view the log. The naming convention of this file is <YYYYMMDD>T<HHMMSS>_Simulate.txt. You can recognize the correct log by the date and time. The most recent log is located at the top of the list.

Results of the Simulate Import are reported in the Log file
Step 3: Notice the summary at the end of the log that identifies 18 parts processed, 16 parts added, 16 Mfr parts added, and 12 distributor parts added. Two warnings are issued that say two parts have Cap is not recognized as a Part Type Category and Component View. Although the Capacitors.csv file includes 18 parts you want to import, CIP is only able to import 16 parts.

Log Summary at end of log
The details of the warnings explain why the two files are excluded from the import: "No mapping found for category 'Cap.' "

Log warnings explain why CIP is unable to process parts
Step 4: Open the Capacitors.csv file in Notepad, Excel, or other txt editor. Find the two parts with the Component Type: 'Cap.' Change 'Cap' to 'Capacitors' and save the file. If you opened the file in Excel, notice the Package Sizes that were originally 0603 were altered to 603 when the file was saved.
Step 5: Return to the CIP Import screen and Import tab. Click the Configuration button. Select and re-upload the updated Capacitors.csv file. Using the Next button page through the Import screens to verify the configuration mappings are still correct. Then click the Save button.
Step 6: Deselect the Simulate checkbox. Click the Add Only button. This time all 18 parts with 18 manufacturer parts and 12 distributor parts are added to the database.

18 new components added to CIP
Step 7: Open CIP from your browser and search for parts with PART_NUMBER containing SAMP. Notice the 18 parts are retrieved in the search results.
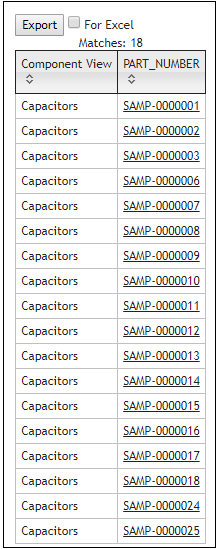
Your search results confirm you have successfully added 18 parts to your CIP database. You are ready to progress to Module 3.