The import process begins with the selection of the Admin > Bulk Operations > Import menu. Each time you select the Import menu, you are required to verify part configuration before you can simulate, add, and update parts. This gives you the opportunity to review and update part mappings when part properties may have changed.
To configure part data from CSV to CIP
1.Select the Admin > Bulk Operations > Import menu.
2.Click the Configuration button.

Configuration Button Opens CSV File Window
If for some reason the import was interrupted by unforeseen activity (e.g. database restart) or the import stalls at the same state, the Configuration button will be disabled and will be enabled after 30 minutes.
3.Click the Choose File or Browse button (depending on your browser) to select the .CSV file you want to import.

Selecting and Uploading CSV File
Note: The CSV file must be a valid CSV file without duplicate column headers. Extra columns of data without headings are considered duplicate headings. Non-ANSI characters in a ANSI formatted CSV file will not import correctly. CSV files containing UTF-8 characters and formatted as UTF-8 will import as the UTF-8 characters. When using Excel to view or edit a CSV file, you will need to ensure that you import the data in the correct format.
4.Verify that the delimiter selected by default matches the delimiter of your file. Enter another delimiter if needed.
5.Click the Upload button. When the upload process is complete, the word "Success" displays to the right of the Upload button.
6.Click the Next button to open the Key Field Configuration screen. This screen shows the CIP fields and the .CSV fields of your uploaded file side-by-side to help you map the key fields.
7.Click the selection arrow of each Import Field to map CIP fields to the field of your uploaded .CSV file.
The image that follows, for example, shows the CIP Field PART_NUMBER being mapped to the Part Num field of your CSV file.

Sample Key Field Configuration Screen
Mapping the CIP PART_NUMBER field to the Part Num field
•Part Number – This is the company part number field. This field is a required field and must be filled in.
•Component View – This is the field in your CSV file that identifies the table for which the part is to be imported. This is a required field.
•Manufacturer – This is the field in your CSV file that identifies the name of the manufacturer. This is an optional field. To successfully import manufacturer parts, both the "Manufacturer" field and "Manufacturer PN" field must be mapped.
•Manufacturer PN – This is the field in your CSV file that identifies the manufacturer part number. This is an optional field. To successfully import manufacturer parts, both the "Manufacturer" field and "Manufacturer PN" field must be mapped.
•Distributor – This is the field in your CSV file that identifies the name of the distributor. This is an optional field. To successfully import a distributor part, both the "Distributor" field and "Distributor PN" field need to be mapped.
•Distributor PN – This is the field in your CSV file that identifies the distributor part number. This is an optional field. To successfully import a distributor part, both the "Distributor" field and "Distributor PN" field need to be mapped.
7.Click Next to proceed to the Capacitors Fields Mappings page.

Component Field Mappings Screen
Note: A separate "Field Mapping" page is provided for each component view. To successfully import parts into a component view, you need to map one or more fields in the Field Mappings page for that component view. The series of gray dots below the Previous and Next buttons indicate the current or active page as you progress through the pages.
8.Click the Auto Map button to automatically map CIP field names that are an exact match to the fields of your uploaded CSV file. Each field may optionally be mapped manually.
Be sure to verify all view configurations each time you go through this process. Changes to the import file may impact parts imported. Review mapped fields and edit as appropriate.
9.Continue through all configured component views. If the Manufacturer Name and Manufacturer PN are configured in step #6, then Manufacturer Field Mappings screen opens. Map manufacturer fields using the same instructions in step #8.

Manufacturer Fields Mappings Screen
Only displays when Manufacturer field mapped in Key Field Configuration screen
10.If the Distributor Name and Distributor PN are configured in step #6, then the Distributor Field Mappings screen opens. Map the distributor fields using the same instructions provided in step #8.

Distributor Fields Mappings Screen
Only displays when Distributor field mapped in Key Field Configuration screen
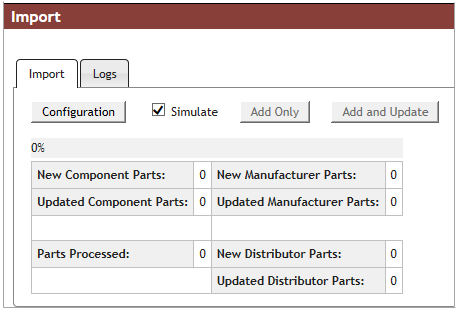
11.Click the Save button that is included on the last configuration mapping page. A summary screen displays that shows the number of component parts processed, updated, and imported. Because you have only completed configuration mappings, each section of the summary screen is zero.
The last saved configuration that is applicable to the newly uploaded CSV file will pre-populate each time you revisit the Field Mappings pages.